Hello there! My name is Kayla, and I am a Master’s student in archaeology at Cornell University. My favorite course this semester is “Field Methods in Community-Engaged Archaeology: Uncovering the Underground Railroad.” I find this class dedicated to exploring the past of Ithaca’s St. James AME Zion Church via documents and weekly excavations to be the most meaningful.
The St. James AME Zion church building was constructed in 1833. The church is still in its original location. Furthermore, the church is believed to be one of the first AME Zion churches in America. Two of America’s most famous abolitionists, Harriet Tubman and Fredrick Douglas, were frequent church visitors. Their visits are a part of the deep history that archaeology can assist in uncovering.
The class and excavations are not just about teaching students about the church and its past. This project is in conjunction with the church and the local community. The past belongs to all of us! More than academics should be involved in its interpretation, interrogation, and preservation. With this post, I want you to come on a dig with me! We will be starting bright and early this Saturday at St. James.
Saturday
09:00
I have arrived at the site and am starting to get settled in. My dig kit, which Cornell provides for students and volunteers, has everything I need for the day! I have a trowel, measuring tape, compass, and string for the unit. However, the most crucial thing in my dig kit is my field journal. In my field journal, I make a note of the many things that need to be recorded, including who I am working with (volunteers, too!), the date, the weather (rain can cause disturbances in our workday), and the daily proceedings, among other things.
09:15
To start the day, I am assigned a partner, Alicia, a fellow Cornell archaeology graduate student. We are also given a volunteer to work with, Ms. Denise. Our volunteer will work with us until lunch; I note this in the field journal. After I write opening notes in my field journal, I collect my field form. A field form is formal paperwork that each unit receives. We note things like measurements, soil description, and artifact density changes. These forms are referred back to when doing more research.
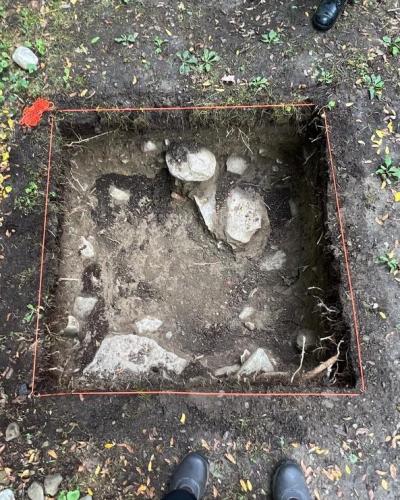
We start the day off by taking elevation measurements of the units (Figure 1). This is done by taking the string used to map out the unit. On the horizontal string, a line level is attached. We hold the string tightly to reach the tape measure that is running vertically down in one corner of the unit at a time. When the string is level, we record the number it is parallel with as the depth of that part of the unit.
When excavating, the goal is to pull the dirt back one to two centimeters at a time. In doing this, when an artifact is found, we are able to give a near-precise recording of where it was found. This gives an opportunity to date what layer we are on.

Ideally, we could utilize each unit to pull back layers of time. However, this site is in an urban setting. This means that archaeologists will often deal with modern disturbances. For example, when electricity, gas, or a septic system is added, that usually causes a disturbance. General construction and foundational upkeep can also cause a disturbance in the stratigraphy.
What is stratigraphy? Stratigraphy is the order the strata are layered. Essentially, it considers that the deepest strata, or layer of dirt, will contain the oldest artifacts. If you dropped a pocket watch today, it would sit on top of topsoil. However, that pocket watch will be covered by dirt deposits in about a century and will no longer be on the topsoil.
10:00
After just thirty minutes of scraping carefully with a trowel, we have a full bucket of dirt! In field proceedings, once a bucket is filled most of the way, someone needs to screen the dirt to look for artifacts.
Screening is the process of placing the contents of the unit that have been collected in a bucket into a mesh screen. Mesh screens come in multiple sizes, but the smaller, the better! With larger screens, perhaps one with holes one-fourth of an inch, very small and important artifacts can be lost. For example, many seeds are smaller than a fourth of an inch! Seeds can give insight into foodways, among other things like herbal medicine practices and even recreational uses.
Our community volunteer, Ms. Denise, went through the screening process for us. Carefully, Alicia and I poured the bucket's contents onto the screen. Ms. Denise lightly shook the screen. Doing this allows dirt to come through the screen while potential artifacts remain within the mesh. As Ms. Denise had volunteered at the site before, she was aware of what would be placed into the site bags for collecting.
10:45
Alicia and I continued to pull back dirt carefully. We were excited to review the things that were found on the screen and collect them into a bag. The artifacts were dirty, but we could make preliminary observations and guesses about what they were! Cleaning in the laboratory will allow for a better look at the artifacts.
11:30
Before we took our lunch break, we retook measurements of the unit. We noted in our journals that we had unearthed about 7 centimeters on average from the morning to the pre-lunch measurements. After taking the measurements, we spent a moment in our field journals noting elements about the dig day.
11:45
Everyone on the site breaks for lunch at 11:45 each Saturday. Doing archaeology involves handling buckets of dirt, screening, and digging. We use this time to recharge and drink plenty of water.
12:15
Considering our pre-lunch measurements, we noted we were likely approaching a stopping point. Although archaeologists from different institutions use different “lingo,” it is usually standard to focus on 10 centimeters at a time. Photographs are taken at the end of “level” or “locus,” as well as measurements. On our field forms, we write a well detailed description of the last centimeters. Were there soil color changes? What are the colors present according to the geological Munsell examples? What type of artifacts were you able to identify at this level? How does this level compare to the previous level of this unit? We are sure to note these elements on the field forms as well as in our journals.
2:45
We are preparing to leave the site. I am excited to get back to the lab on Friday and wash the artifacts so that we can give them a closer look. To close up the site for the day, we ensure all paperwork is complete and in its proper place, each unit is covered with plywood to minimize interference in the interim, and tools and supplies are packed away.
Friday
Washing artifacts is a reasonably simple process. In the lab space, we utilize the sink to fill a small tub with warm water. Each artifact gets time either to soak in or dip into the water. Small, bristle-based brushes are used to remove excess dirt. After the artifacts are cleaned, they are placed out to dry over the weekend.
Monday
Now that they are clean and dry, we can tell a lot more about the finds that were recovered from the site this past Saturday.
Ceramics are one way to help date a unit and a site overall. There are many types of ceramic wares and styles that exist. Stoneware is an early type. It is a thick ceramic and is good for food like stews. Redware is one of the most simple and most common types. You may have seen some recently! A commonly used example of redware without any glaze is the common flower pot.
Yellowware, Creamware, and Whiteware are three of the most common types of wares. They each are a European-manufactured take on Chinese porcelain. Porcelain is a very sought-after type of ceramic, even in the modern world. As Europeans were experimenting with making ceramics close to porcelain, yellowware and creamware were the elders in this line of attempts compared to whiteware.
Within each ware, there are multiple types of design choices. If there are, for example, six pieces of whiteware found at a site, one could be blue transfer printed, flow blue, gilded, decal printed, hand painted polychrome, and sponge printed. These names all speak to different types of stylistic choices that the manufacturers made.
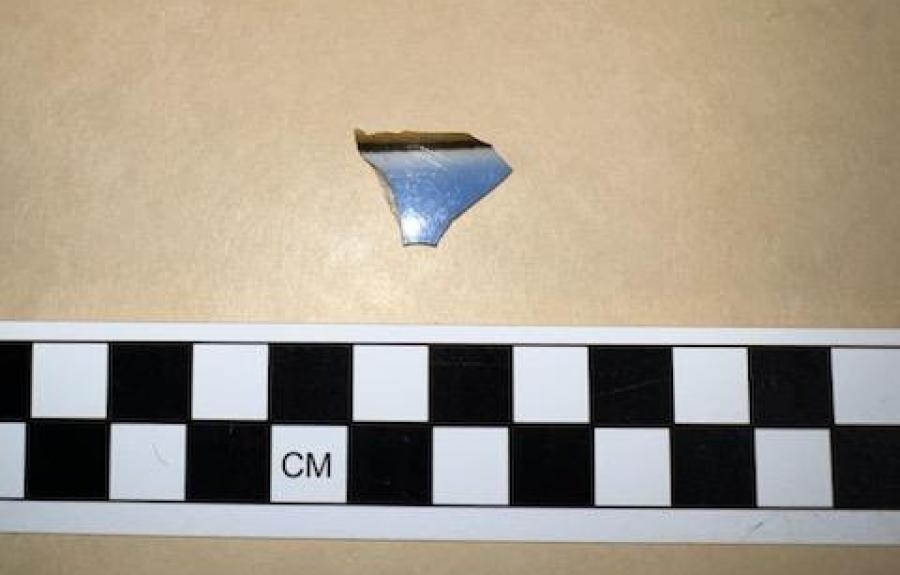
This piece (Figure 2) is blue annular ware. It is a small sherd, but the mocha-colored stripe just visible towards the sherd’s top gives it away. Annular ware is known for its bands. It comes in many colors, like olive green, ochre, and pale blue (seen in Figure 2). This type of ceramic was produced from 1784-1840. More specifically, the pale blue featured in this ceramic was most popular after 1820.
When a piece of ceramic gives you a date range, there are many things to consider. First, different types of variations within that date range may help you narrow the date that the piece found is likely from. For example, if annular ware is found on creamware, its manufacture date is older than the annular print found on whiteware.
Nevertheless, these dates are related to the likelihood of manufacturing and not the date of use. What does this mean? Well, an example could be your favorite sweater that your mother gave you! It could have been her sweater in the 1990s and produced by a brand that is now out of business. Be that as it may, the sweater is still in good condition, and you wear it from time to time in the 2020s. Ceramics, and other artifacts, are the same way.
Another common belief is that the presence of older ceramics may relate to status. That is only sometimes the case. Referring back to the sweater example, both you and your mother likely have purchased dozens of sweaters from 1990 to the present 2020s. Nevertheless, that sweater is still around not because of a financial inability to purchase more sweaters. It is still around because it is something that the people around it are fond of and would like to keep around. It can also be viewed as an heirloom as it was given to you by your parent. Thus, just because we see ceramics that may predate an archaeological site does not mean that the individuals at the site were a part of a certain social or financial class.
The individuals that were at the site could have been frugal and wanted to use what they had; it is also plausible that they could have had an emotional attachment to the items. It’s also plausible they could have been an organization, like a shelter, where people donated things they no longer needed for the use of the greater community. It’s similar to giving your local soup kitchen your older stove as your household has just obtained a new one.
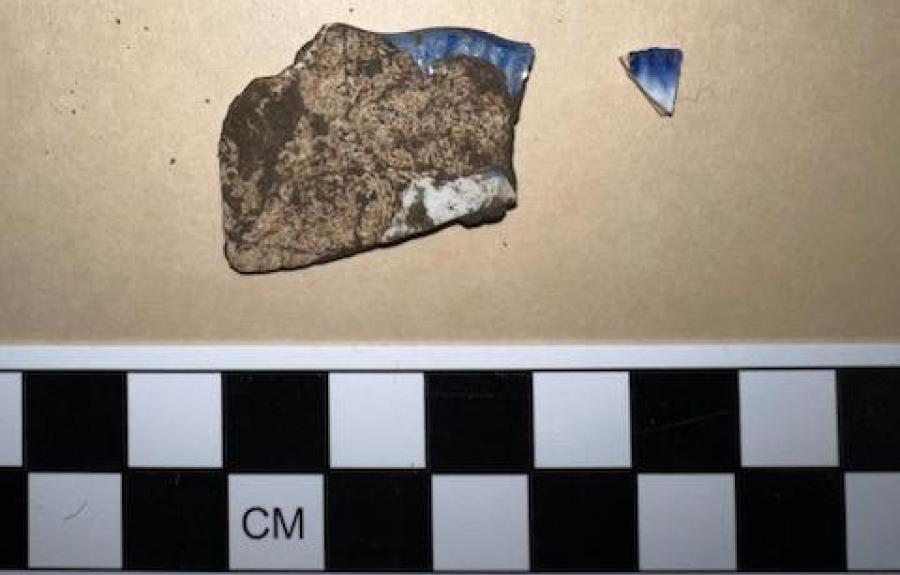
Found in a unit on site are shell-edged ceramic sherds (Figure 3)! The date range of shell-edged ceramics is very similar to that of annular ware: 1785-1840. Shell-edged ceramics are also called feather-edged or simply just edgeware. This type of decorative choice is almost exclusively found on table wares. While our examples are blue, this type of design can also be found in green.

Another piece of ceramic we saw last Saturday is a whiteware sherd (figure 4). Although it is less than 6 centimeters, it showcases one of the wonders of archaeology and what it can (or, in this case, almost!) unearth. The black, coiling lines on the left of the sherd (which would usually be found on the back of the once intact dish and more towards the center) are all that remains of a maker's mark.
Makers' marks allow for a more precise interpretation of the unit and site overall. Manufacturers, or makers, often changed their marks from time to time. Thus, having a clear look at a maker's mark allows for a more precise guess of a date rather than the larger spans that speak to the ceramic type. Furthermore, there are manufacturers in both Europe and America. Having the mark gives more of an opportunity to speak to the plausible financial pull of the site, as it would cost more to purchase something that was imported versus something that made have been more local.
Ceramics are only one of the many artifacts archaeologists deal with at a site. Glass, coal, bone, plastic, fabric, nails, and metals are just a few of the larger categories of artifacts that can be found at a historical site. All these materials have been found at St. James. If you come on another dig with me, I can introduce you to another category of artifacts and build on your new knowledge of ceramics. Thanks for learning more about St. James AME Zion Church with me!